Introduction — What is a Retaining Ring and Why Proper Installation Matters
A 固定环 (also called a Snap ring, circlip, or retaining clip) is a mechanical fastener that is used to bind components together. This is typically used to hold together a shaft and a cap or to bind two components together in a one-to-one ratio. Its objective is to hold down bearings, gearings, seals, or other machine components, preventing axial movement while allowing rotation or other relative motion.
In many machines, including engines, gearboxes, hydraulic cylinders, pumps, and rotating assemblies, retaining rims are a budget-friendly way to control the position of the axles without having to invest in bulky shoulder, nuts, or welds. Because they are budget-friendly, simple to install, and require minimal space or processing, they are commonly utilized in the automotive, aerospace, hydraulic, manufacturing, and consumer industries.
However, and this is of paramount importance, a retaining ring is only effective if it’s installed correctly. Incorrect installation can cause ring distortion, failure under pressure, accidental displacement, or damage to the grooves or shaft, all of which can lead to a catastrophic mechanical failure, misaligned bearing, or safety risks. As a result, understanding and following the proper procedure for installation is crucial to safety, reliability, and the long life of equipment.
This guide describes, in detail, how to install a retaining ring correctly – covering the preparation, tools, installation methods, inspection, and common errors – so that the ring is effective as intended in the presence of load.
Types of Retaining Rings — Understand What You’re Dealing With
Before installation, it’s beneficial to know the type of retaining ring you have, as this will help to differentiate between types of installations and precautions. Common variants include:
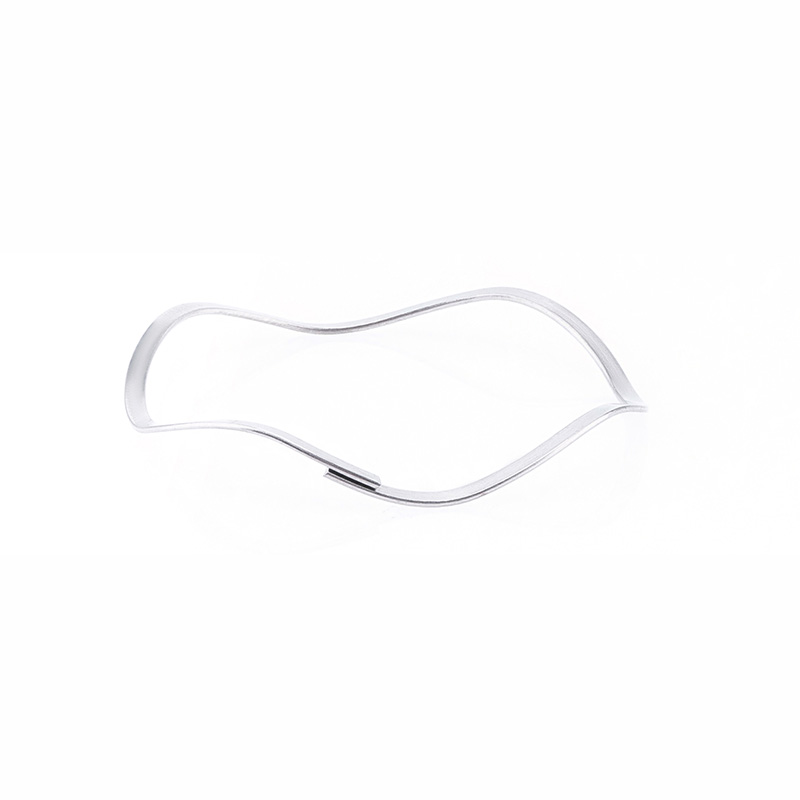
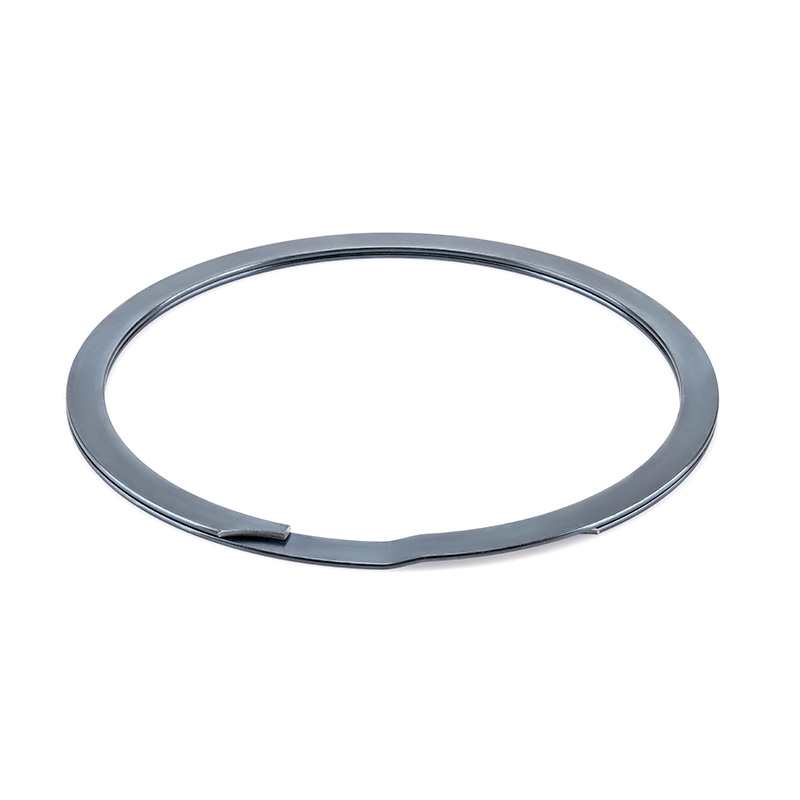
External Snap Rings (also known as External Retaining Rings): These are located around the outside of a shaft and have a circumferential slot as their seat. Used to prevent the motion of components around a shaft.
Internal Snap Rings (internal retained Rings): They’re designed to be inserted into a hole or groove in order to maintain a seal, support a bearing, or other internal components.
E-rings / C-clips: Rings that have open ends that can be snapped into position; these are typically used for heavier or more difficult-to-install loads.
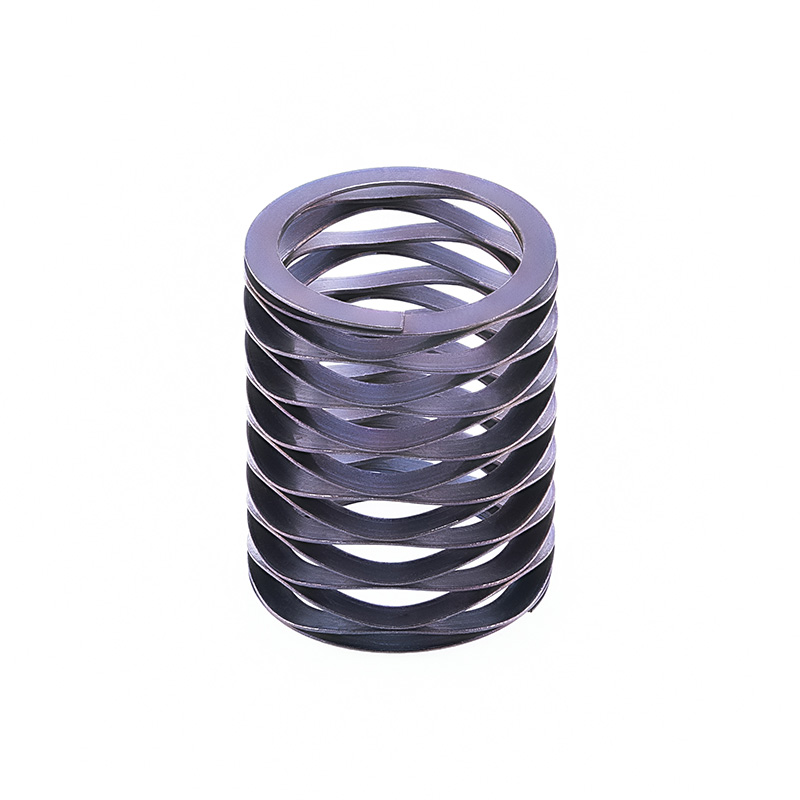
Spiral ring retainers: A helical, coiled ring that is wound into a valley – this provides a full 360 degree of 接触 and a more even distribution of loads, often used in high-stressed or heavy-duty applications.
Constant ring sections ( Constant-cross-section circlips): These have a uniform cross section, which is often thinner, for scenarios with lighter duty or limited space.
Each type of ring has its own procedure for installation, tolerances, specifications for grooves, and limitations. always discuss the specifications of the ring’s manufacturer, the type of 材料 used, and the maximum load that can be supported before installing the ring.
Pre-installation Preparation — Safety First, and Verify Components
Before you begin installing a ring that will retain things, it’s important to have a thorough approach. Skipping the preparation process often results in misaligned seats, distortion, or even injury.
- Acquire the correct instruments
Depending on the type of ring (external/ internal snap ring, spiral, E-ring), the necessary tools may differ. Commonly employed tools include:
Snap-ring pliers ( internal or external ) — these have tips that fit into the ring spaces or ends, which enable controlled expansion or compaction.
Installation/assembly mandrels or drift tools — these tools are used to guide the ring into a groove without causing damage.
Protection for the glove and the eye, to prevent the ring from snapping back or flying debris from hitting the ring.
Clean cloths / lint-free towelettes — for cleaning the shaft, grooves, and bore before installation.
Degreasing or cleaning solvent (if necessary) — to remove oil, grease, and other debris from the grooves or shafts.
Lubricant (if present) — Some bands, shafts, or bores may need to be lightly coated to facilitate installation and reduce wear.
- Inspect the Shaft, Bore, and Groove?
Ensure that the groove’s geometry is appropriate for the manufacturer’s specifications; the width, depth, surface quality, and position along the shaft or bore must correspond with the ring’s design. A valley that is too shallow, too narrow, or has flaps may impede proper sitting.
Clean the gorge, shaft, or bore completely – remove chips, burrs, dirt, oil, rust, or paint – any debris may impede the seat or cause the ring to deform.
Examine the ring’s authenticity: make sure it isn’t embellished, deformed, damaged, or confused. Never attempt to install a malformed ring – discard and replace.
Confirmation of tolerances: the shaft’s or bore’s diameter should be within the acceptable range for ring compatibility. Excessive runout, othality, or distortion of the shaft can cause stress or failure in the ring.
- Know the Difference between the Load and the Conditions of Use
Discover the maximum load that can be supported, the maximum load that can be supported by a given ring type and material, and the environmental conditions (temperature, corrosion, lubricants) that are appropriate for a particular ring type and material. For applications that have a heavy-duty or high-capacity, Spirals or hardened Alloys are more effective.
If the assembly will be disassembled and reassembled multiple times (maintenance, 服务), consider the ring type’s capabilities: Spiraling rings are often more effective at accommodating reuse than standard Snap rings, which may have a greater propensity to fatigue over repeated expansion and compression cycles.
With careful planning, you greatly increase the probability of a successful, dependable installation.

Step-by-Step Installation Procedure
Below is a recommended procedure for installing a typical external or internal Snap-type ring that uses Snap-ring pliers. Changes may be made based on the style of ring (spiral, E-ring, constant section), but the fundamental design remains the same.
Step 1: Situate the Workpiece with confidence
Fasten the shaft (or housing/bore) to a solid support, a bench with soft jaws, or a device that prevents movement during installation. Avoid using a hard-jawed vise that may adversely affect surfaces.
Ensure the shaft or bore is spotless and free of debris, the groove is apparent and accessible, and the lighting is sufficient.
Step 2: Prep the Ring
Review the ring’s appearance in order to assess whether it’s distorted, has cracks, or is simply damaged on the surface.
If mentioned by the manufacturer, utilize a light film of lubricant or anti-wear compound on the ring’s ends or interior (only if recommended; over-lubrication may attract trash).
Step 3: Use Snap-Ring Pliers to expand or compress the ring
For external pliers that fit around the shaft: Use external snap-ring pliers. Inserted tips should be inserted into the ring’s eyelets or holes, and gently and uniformly squeezed; the expansion of the ring should be enhanced.
For internal snap-ring (which is sized inside the bore): Use internal snap-ring pliers; insert tips into the ring’s recess or holes, and gently compress the ring in order to reduce its diameter, make it fit into the bore.
Spread (or compress) just enough to cover the outer diameter of the shaft (the external ring) or the inner diameter of the bore (the internal ring). Over-expanding or compressing will lead to distortion or stress in the ring.
Step 4: Insert the Ring into the Groove and seat it there
With the ring’s size expanded or compressed, carefully lower it onto the shaft or into the bore until it is in line with the groove.
Gradually release the pliers, allowing the ring to either decrease in size or increase in size, depending on the external or internal pliers. Ensure it is completely embedded.
Visually assess: make sure the ring is positioned in the designated space, is flush (not tilted), and is fully involved in the entire process. The gaps between the ring and the grooves on the floor or shoulders should be eliminated.
If the ring has a hard time filling out, don’t hammer it; instead, check the dimensions of the shaft or bore, or the ring’s integrity.
Step 5: Ensure Effective Proposal — Inspection and Testing
Once you have seated the ring, you must make sure it’s positioned correctly before completing the assembly or applying the load:
Use a feeler tool or caliper to assess the clearance of the rings: measure the lateral play of the components, making sure they cannot exceed the acceptable range.
Turn, slide, or lightly tap the component (if permitted) to double-check that the ring is solid.
For applications that are critical (such as bearing retention, shaft shoulder stress), consider using a non-destructive inspection device or load test to verify that the ring is stable under the expected operational conditions.
Track the type of recording, the dimensions of the grooves, and the date of installation in the logs of maintenance. This information is helpful for future maintenance, scheduling, or failure detection.
Special Cases: Installing Spiral Rings, E-Rings, or Other Non-Standard Retainers
Not all external/ internal retainers are standard. In some instances, spiral bands or E-rings (C-clips) are employed, which require a different protocol.
- Spiral Packing Rings
A spiral ring is envisioned – the process involves ” winding” it into the valley instead of increasing or decreasing. Typically, a rod or mandrel is employed.
Method: Place one end of the spiral ring into the grooves, then rotate/wind the ring around the shaft/bore until all of the coils are placed in the grooves. Ensure the coils are equally placed (no overlap, no gaps).
Because the spiral bands have a contact angle of 360 degrees, they spread the load over a larger area, which is ideal for heavy or rapid applications. However, installation must be efficient and smooth to avoid kinking or uneven placement.
- E-Rings / C-Clips
These are often inserted by hand or using flat-nose pliers; they are less stable under heavy pressure compared to Snap Rings, and are typically used for light-duty, low-power, or non-essential tasks.
Ensure the correct orientation (E-rings that are “open” have a side that faces the direction of load), and make sure they are secure before using them.
- The utilization of Ring-Bagging tools and Pre-loading fixtures
For assemblies that have a high volume or are repetitive (e.g., production line), consider using dedicated tools or devices that are used to install retaining rings (e.g., pneumatic pliers that are used to open cans, installation jigs, and safety devices).
For components or shafts that are required to maintain precise alignment, use preload or alignment fixtures to prevent misalignment in the axial or radial direction during the installation of the ring.

Common Mistakes and Pitfalls in Installing Retaining Rings — and How to Avoid Them
Even experienced technicians sometimes make errors when installing retaining rings. Below are common mistakes, consequences, and best practices to avoid them:
| Mistake / Pitfall | Consequence / Risk | Prevention / Best Practice |
| Using a worn or deformed ring | Poor seating, ring failure under load | Always inspect the ring before installation; discard damaged rings |
| Over-expanding (or over-compressing) the ring | Distortion, loss of elasticity, weakening, premature failure | Use correct snap-ring pliers; expand/compress only as needed |
| Dirty or damaged groove/shaft/bore | The ring may not seat, may slip under load, cause wear or damage | Clean, deburr, inspect groove & mating surfaces thoroughly |
| Incorrect groove dimensions or shaft tolerances | Poor engagement, side-play, possible ring dislodgement under load | Verify dimensions meet manufacturer specs before assembly |
| Hammers / makeshift tools for installation | Ring or component damage, injury risk | Use proper tools (pliers, mandrel, fixtures), never strike ring directly |
| No inspection after installation | Hidden mis-seating, potential failure under operation | Always inspect — visually, with gauge/caliper, and test under load/rotation if possible |
| Repeated reuse of snap rings in high-load applications | Fatigue, loss of springiness, unexpected failure | Avoid reusing snap rings under heavy or safety-critical loads; replace as per the maintenance schedule |
By recognizing these risks and applying proper practices, you reduce the likelihood of ring-related failures, component damage, or downtime.
Maintenance, Replacement, and Re-Installation: Best Practices
The installation of the system is only part of the life cycle; the retaining ring also needs to be inspected, maintained, and possibly replaced to ensure long-term effectiveness. Here are suggestions:
Constant monitoring schedule: This is especially true of equipment that has a lot of motion or vibrations (gears, shafts, bearings). During scheduled maintenance, inspect the retaining rings in order to check for wear, distortion, corrosion, or loss of tension.
Substitute rather than reuse under high pressure: For applications that are critical or supportive, it’s typically more effective to substitute rings than reuse old ones, even if they seem to be in good condition. Spring fatigue, micro-cracks, or material deterioration may not be apparent.
Check the integrity of the grooves: Ensure the grooves are not damaged, deformed, or corroded — because the ring’s position is based on the integrity of the grooves. If the grooves are damaged, mend them or machine them before installing a new ring.
Maintain hygienic and lubricant status (if pertinent): Keep the shafts or boreholes clean, avoid obstruction. If lubrication is employed, make sure the lubricant is compatible with the ring’s material, or it will degrade or attract abrasive particles.
Document the type of document, size, installation date, and load conditions: This facilitates the tracking of document performance, scheduling proactive replacement, and diagnosing potential future issues.
When to Use Retaining Rings — Appropriate Applications and Limitations
Rings that are retained are both versatile and commonly employed, but they aren’t always the most effective solution. Understanding when to utilize them and when not to is equally essential.
Advantageous Situations:
Components, seats, bolts, or other structural components that are large or heavy need to be located on the side of the shaft, hence the name of this method.
When there’s limited space or the weight is of the utmost importance (e.g., small shafts, compact arrangements, rotating parts).
Moderate to high volume production or maintenance: retainers offer a quick combination or disassembly, ease of replacement, and are budget-friendly.
When disassembly for maintenance, replacement, or servicing is expected, retaining rings allow easier removal than welded or shoulder-based fastenings.
Limitations/ When the Retaining Rings May Not Be Adequate:
High-load or impact scenarios where the ring strength or fatigue life is lacking — in these scenarios, shoulders, Snap-On housings, bolts, or more powerful retention are more appropriate.
Employees will have a hard time performing assignments that require a lot of axial force or frequent heavy load switches. These applications are repeated frequently and can lead to fatigue or failure.
Violent environmental conditions — extreme corrosion, high temperatures, and abrasive media — unless the ring’s material and design are taken into account.
When precision is of the essence and minor ring spring tolerances or seatings are involved, parts may need to be machined or interference-fitted, which may be more dangerous.
Ultimately, consider the pros and cons of using retaining rings; they are effective in certain situations, but not universally applicable as fasteners.
Summary & Best Practice Checklist
Here is a list of consolidated recommendations that summarize the best practices for installing and utilizing retaining walls.
- Select the appropriate ring type (external or internal, or spiral and constant section) for the purpose.
- Check the dimensions of the shaft, bore, and groove, and make sure they match the specifications of the ring manufacturer.
- Employ proper instruments (pliers that snape, mandrels that support, fixtures that hold) and avoid improvised methods.
- Clean and inspect the grooves, shafts, and ring before installation; remove dust, debris, oil, and rust before installation.
- Increase or decrease the stress as necessary; avoid over-exposure.
- Ring the seat around carefully and evenly, make sure all of the seats are fully occupied and in a flush position.
- Inspect the installation using a feeler’s gauge or caliper; if possible, do a light load or rotation test.
- Log data regarding installation (ring type, size, date, purpose).
- Schedule regular audits; instead of reusing the rings, they are replaced when there is a high demand or a safety concern.
- Avoid utilizing the ring in applications that exceed its design capacity — choose alternative methods of retention when the load is heavy, the stress is high, the frequency of reversals is frequent, or the environment is harsh.
By following the checklist and the procedure above, you can maximize the reliability, safety, and life of assemblies that use retaining rims.
结论
A ring that retains things can have a significant impact on mechanical assemblies, as can an inexpensive, simple ring. Its capacity to regulate the position of the axles, maintain the bearings or components, allow for compact designs, and support frequent re-assembly or disassembly makes it popular in many industries.
However, only when it’s installed correctly – with proper preparation, tools, method, and post-installation monitoring – will the ring have a dependable performance. Mistakes in installation or omission of maintenance can result in failure, standstill, or even safety risks.
As a result, understanding the different types of retaining walls, selecting the appropriate type of wall and groove design, and following a protocol for mechanical installation is crucial to the engineering of mechanical devices, maintenance personnel, and machine builders.
Use this guide as a guide when you install or inspect retaining rings, and you should incorporate its list of checkouts into your standard procedure to ensure long-lasting, safe, and quality assemblies.